Sparkling shiny things with Metal and SwiftUI
Today’s inspiration comes from this amazing animation.
Decomposing the details, there are three main parts of this interaction:
- Glowing border
- Ripple wave
- Flowing particles
We will create them step-by-step with Metal and SwiftUI, starting from top to bottom
But before all define the basic layout of our view. Further we will be enhancing it step by step.
import SwiftUI

struct ReactiveControl: View {
  var body: some View {
    GeometryReader { proxy in
      ZStack {
        Capsule()
          .fill(.black)
        Capsule()
          .strokeBorder(
            Color.white,
            style: .init(lineWidth: 1.0)
          )
      }
    }
  }
}

#Preview {
  ZStack {
    Color.black.ignoresSafeArea()
    ReactiveControl()
      .frame(
        width: 240.0,
        height: 100.0
      )
  }
}
Glowing border
Before writing shader code we need to plan the behaviour. So the main trigger of glowing effect is the location of the user’s touch. The rule is:
The closer the border is to the point of touch, the brighter it is. Conversely, the further away it is, the more transparent it is.
Schematically it would be illustrated as this. Thicker rectangle represents brighter pixels, thinner - dimmer.
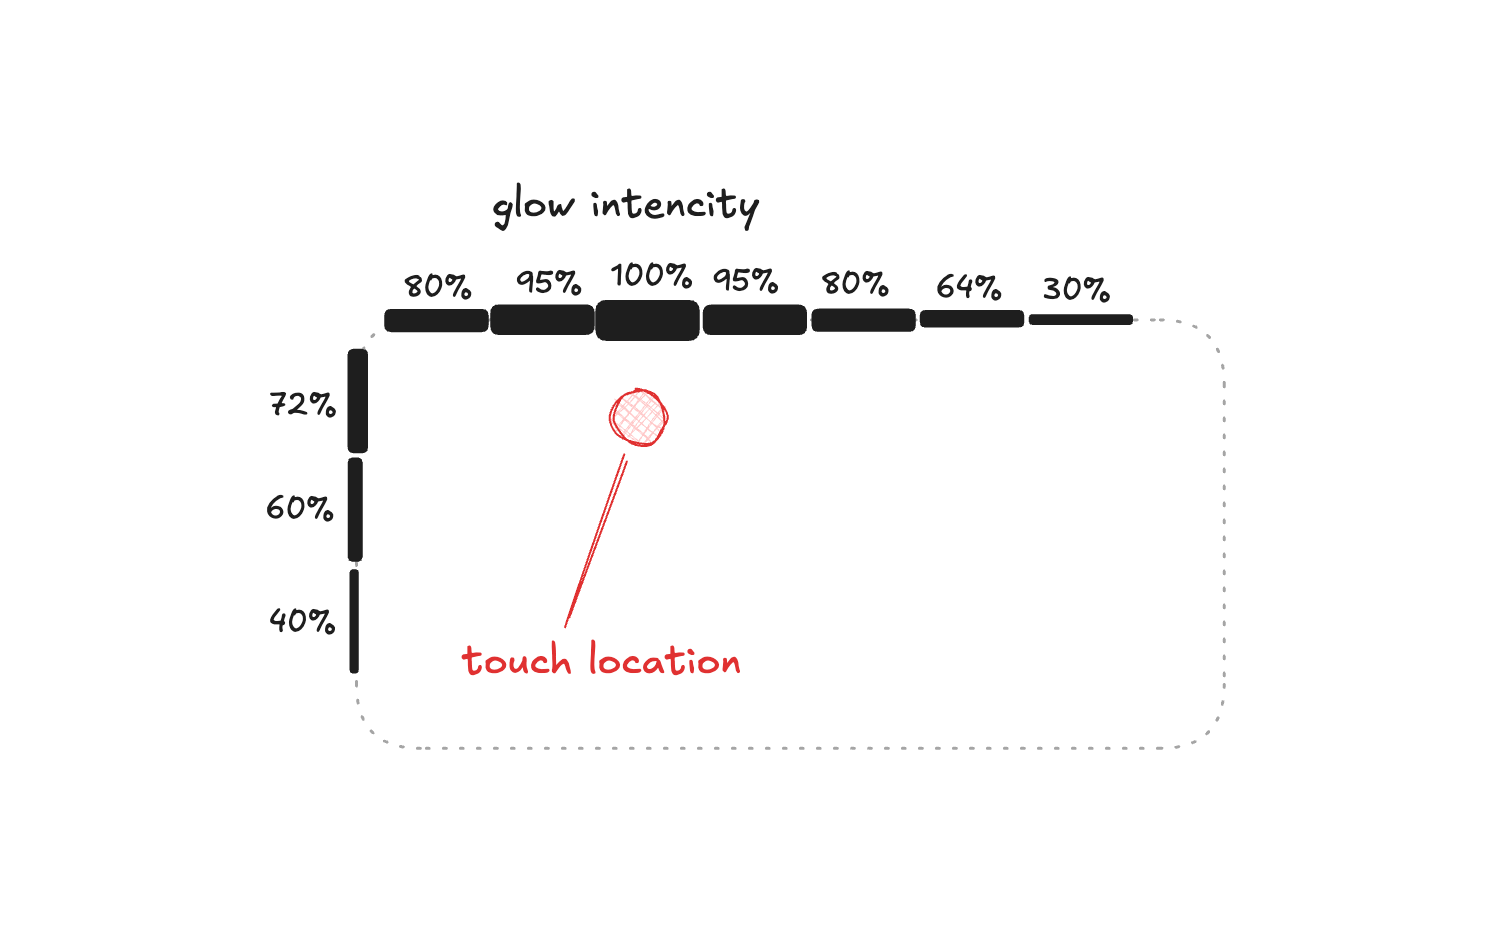
Thus one of the main parameters for the shader to work is the touch location, moreover we need to distinguish the first touch from all the others happening while user is dragging a finger.
Touch handling
Let’s play from this and define the infrastructure for touch handling in the initial view, here DragState models the two states of user touches.
struct ReactiveControl: View {
  private enum DragState {
    case inactive
    case dragging
  }

  @GestureState private var dragState: DragState = .inactive
  @State private var dragLocation: CGPoint?

  ...
}
Next update the view hierarchy with a DragGesture instance. We set it’s minimum distance to .zero so the gesture starts right after user is touching a screen. Using .updating modifier we associate the gesture with the previously defined DragGesture.
var body: some View {
  GeometryReader { proxy in
    ZStack { ... }
    .gesture(
      DragGesture(
        minimumDistance: .zero
      )
      .updating(
        $dragState,
        body: { gesture, state, _ in }
      )
    )
  }
}
You can read more about modeling complex gestures in this article from Apple
At this point, it remains to define the logic for handling gesture states. Every time the user triggers a gesture, we start in the inactive state - this is handled automatically by SwiftUI. Now all we need to do is assign the location position and move on to the next state.
When the user drags their finger, we update the location based on the view size as well.
.updating(
  $dragState,
  body: { gesture, state, _ in
    switch state {
    case .inactive:
      dragLocation = gesture.location

      state = .dragging
    case .dragging:
      let location = gesture.location
      let size = proxy.size

      dragLocation = CGPoint(
        x: location.x.clamp(min: .zero, max: size.width),
        y: location.y.clamp(min: .zero, max: size.height)
      )
    }
  }
)
Here clamp is the mathematical function which checks that the current value does not exceed the defined limits. If the value is within limits, it will be returned, otherwise the nearest limit value will be returned. For example, 3.clamp(min: 4, max: 6) will return 4, because the provided value 3 is lower than the minimum available value 4.
extension Comparable where Self: AdditiveArithmetic {
  func clamp(min: Self, max: Self) -> Self {
    if self < min { return min }
    if self > max { return max }
    return self
  }
}
Thus, the location calculation means that the location of the gesture should not extend beyond the bounds of the current view.
dragLocation = CGPoint(
  x: location.x.clamp(min: .zero, max: size.width),
  y: location.y.clamp(min: .zero, max: size.height)
)
Glowing shader
Now we are good to proceed with the shader itself, start by creating a ViewModifier to incapsulate the related logic. The touch location required to calculate the glow intensity is represented by the origin parameter.
struct ProgressiveGlow: ViewModifier {
  let origin: CGPoint

  func body(content: Content) -> some View {}
}
Populate function body with the visualEffect modifier call.
func body(content: Content) -> some View {
  content.visualEffect { view, proxy in }
}
As the documentation states, this modifier provides information about view’s geometry without affecting it’s layout. Seems to be a nice alternative to the GeometryProxy when it comes to animations.
One of the effects we want to use here is the colorEffect. This modifier builds SwiftUI visual effect instance based on the provided Metal shader.
content.visualEffect { view, proxy in
  view.colorEffect(
    ShaderLibrary.default.glow(
      .float2(origin),
      .float2(proxy.size)
    )
  )
}
Thanks to ShaderLibrary type, SwiftUI is capable to retrieve Metal shaders and interact with them.
ShaderLibrary.defaultsyntax means that the shader code search will take place in the main bundle. If.metalfiles are located in a bundle other than.main, useShaderLibrary.bundle(_:)builder.
We access a required shader just by calling it as a usual Swift function, it works because of the @dynamicMemberLookup on top of ShaderLibrary. In our case we assume that the shader function name we will define in .metal file will be glow.
In the method call we pass the necessary parameters, in our case it is the touch location and view size. To make them understandable for Metal, we wrap them in the float2 primitive, which is basically a vector / list / array / ordered pair of two values. Such a pair is in fact CGPoint or CGSize.
See the
Shader.Argumenttype to find more primitives available for passing.
Let’s proceed to writing the shader code. Create a new .metal file and add the following starter code.
#include <SwiftUI/SwiftUI.h>
#include <metal_stdlib>

using namespace metal;

[[ stitchable ]]
half4 glow(
  float2 position,
  half4 color,
  float2 origin,
  float2 size
) {
  return color;
}
First we need to normalise the received coordinates within the bounds of the current view in order to perform further calculations without depending on the absolute values of the dimensions.
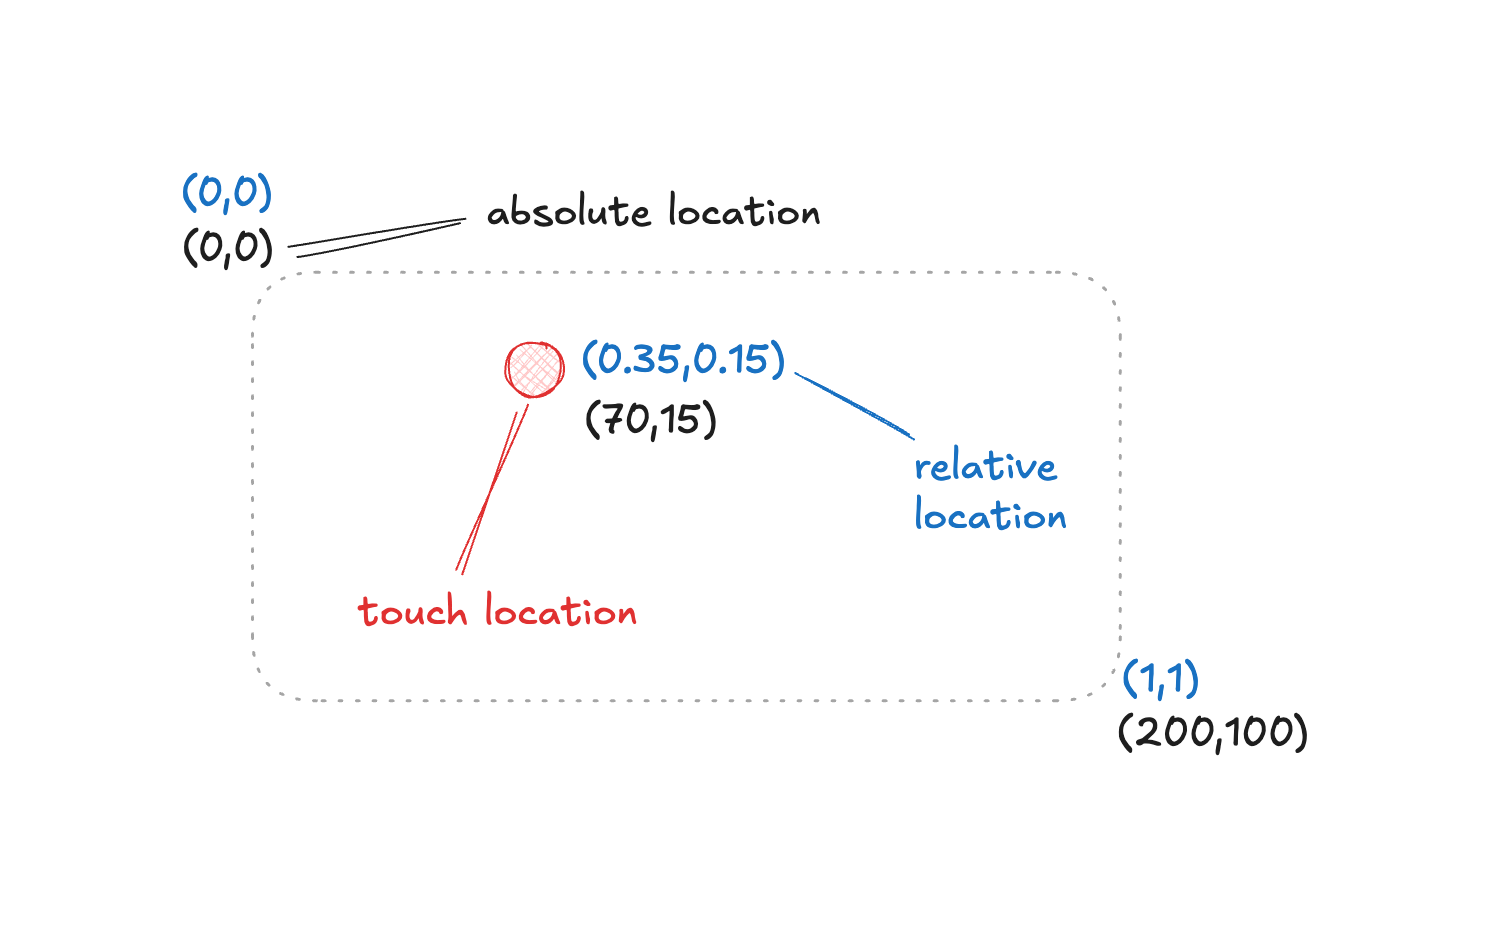
To do this we divide the coordinates by the size of the view.
float2 uv_position = position / size;
float2 uv_origin = origin / size;
Next we calculate the distance from the origin to the pixel on the border.
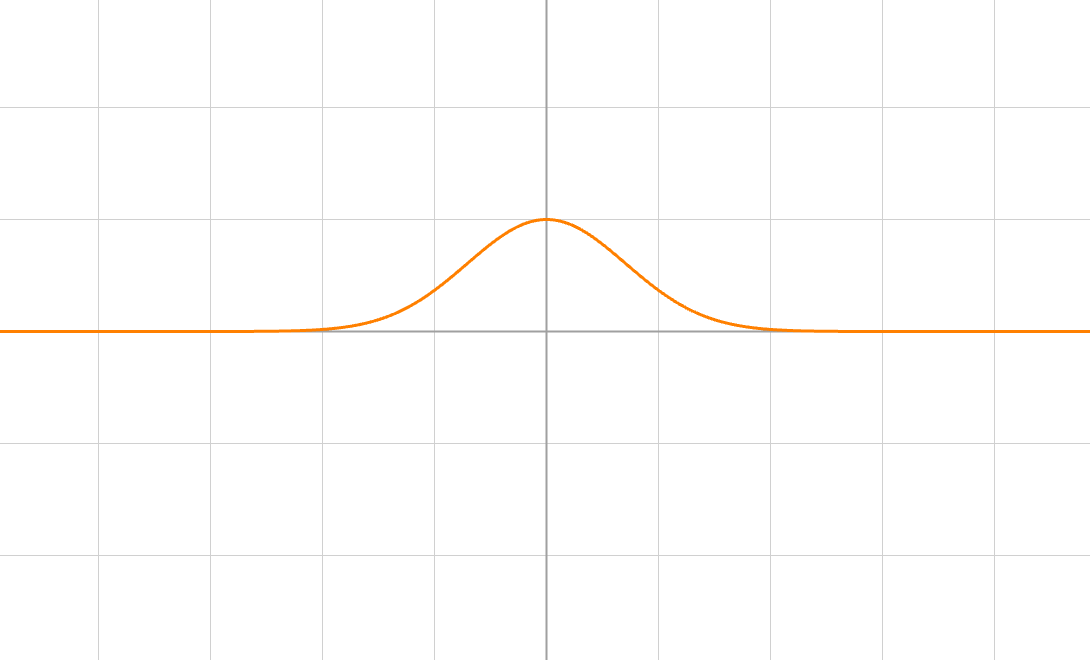
float distance = length(uv_position - uv_origin);The glow intensity will be based on exponent of negated distance square. This function is ideal for our problem - as the distance increases, the resulting value tends to zero.
float glowIntensity = exp(-distance * distance);You can use graphtoy to verify the behaviour of the described functions.
Then we modulate the intensity a bit to further limit the spread of the glow. Here the smoothstep function acts pretty the same way as the clamp function we’ve defined earlier
glowIntensity *= smoothstep(0.0, 1.0, (1.0 - distance));Here is the demonstration of the composition of these functions.
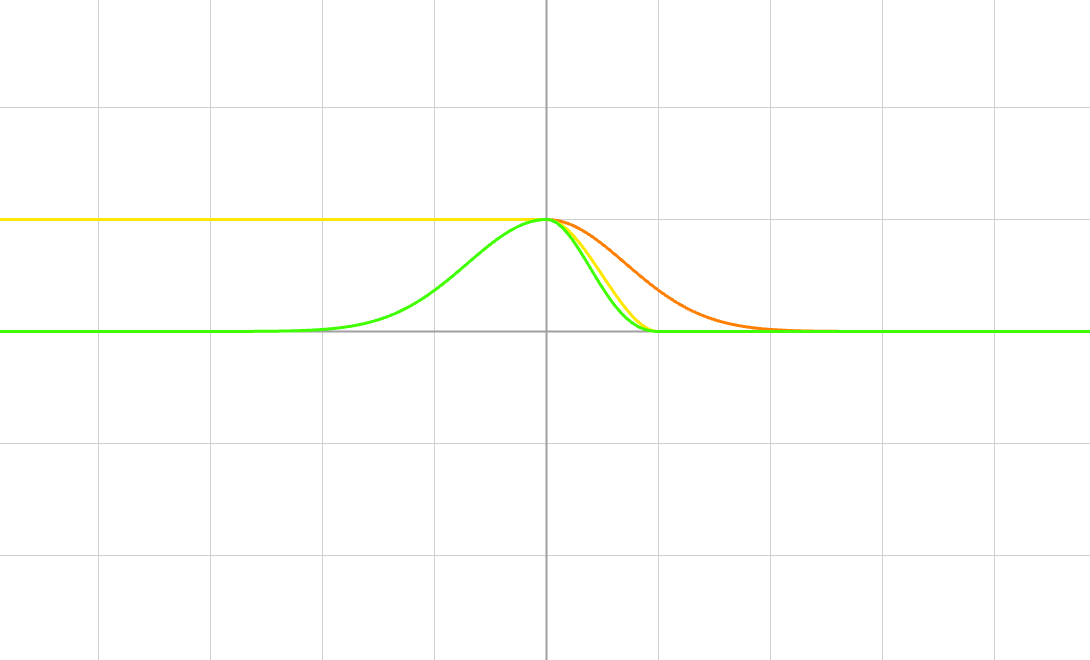
And finally all we need is return the resulting color with the applied intensity coefficient.
return color * glowIntensity;Check the resulting code to make sure nothing is missed.
[[ stitchable ]]
half4 glow(
  float2 position,
  half4 color,
  float2 origin,
  float2 size
) {
  float2 uv_position = position / size;
  float2 uv_origin = origin / size;

  float distance = length(uv_position - uv_origin);

  float glowIntensity = exp(-distance * distance);

  glowIntensity *= smoothstep(0.0, 1.0, (1.0 - distance));

  return color * glowIntensity;
}
Back to SwiftUI code, we need to apply this shader. Initializing ProgressiveGlow, we
ZStack {
  ...
  Capsule()
    .glow(fill: .palette, lineWidth: 4.0)
    .modifier(
      ProgressiveGlow(
        origin: dragLocation ?? .zero
      )
    )
}
The glow effect we applied to the Capsule uses a SwiftUI-only implementation, which is detailed in this article.
You may notice that the glow starts at the top left corner, moreover it’s displayed all the time, regardless of whether there is an active touch or not.
Timing the glow
To fix this, we need to introduce the concept of glow progress assuming that it’s value may vary in range from 0.0 to 1.0. Here we also introduce declare amplitude that will help us control the glow intensity from the outside.
Since from SwiftUI we call this shader as colorEffect, in Metal we need to define its interface in a special way. In short, [[ stitchable ]] allows us to delegate the search and method call to SwiftUI, the position and color parameters are also passed by SwiftUI automatically.
More about attributes in Metal can be found in the official language specification.
[[ stitchable ]]
half4 glow(
  float2 position,
  half4 color,
  float2 origin,
  float2 size,
  float amplitude,
  float progress
) { ... }
First modify the original intensity function by multiplying it by the amplitude and progress. This will ensure that the intensity will gradually vary along the length as the progression changes.
float glowIntensity = smoothstep(0.0, 1.0, progress) * exp(-distance * distance) * amplitude;Then make the modulation depend on the progress. Because of this change, the intensity will gradually spread from the point closest to the touch to the furthest point as the progress changes.
glowIntensity *= smoothstep(0.0, 1.0, (1.0 - distance / progress));Going back to SwiftUI, we add progress as the ProgressiveGlow parameter. We also need to provide values for the shader parameters just defined. Here the amplitude value is assumed to be 3.0, but you can change it to a more convenient value for you.
struct ProgressiveGlow: ViewModifier {
  let origin: CGPoint
  let progress: Double

  func body(content: Content) -> some View {
    content.visualEffect { view, proxy in
      view.colorEffect(
        ShaderLibrary.default.glow(
          .float2(origin),
          .float2(proxy.size),
          .float(3.0),
          .float(progress)
        )
      )
    }
  }
}
It remains to implement an animation mechanism for the glow, the heartbeat of which will be based on keyframe animation. Add a state variable glowAnimationID that identifies the active glow animation.
struct ReactiveControl: View {
  @State private var glowAnimationID: UUID?

  ...
}
Then replace a direct assign of modifier with keyframeAnimator wrap. Here the previously defined glowAnimationID acts as a trigger for the animation and fires it whenever its value changes. The elapsedTime parameter provided by closing the content of an animation represents, for our purposes, the progress of that animation.
Capsule()
  .glow(fill: .palette, lineWidth: 4.0)
  .keyframeAnimator(
    initialValue: .zero,
    trigger: glowAnimationID,
    content: { view, elapsedTime in
      view.modifier(
        ProgressiveGlow(
          origin: dragLocation ?? .zero,
          progress: elapsedTime
        )
      )
    },
    keyframes: { _ in ... }
  )
Using keyframes closure we can control the elapsedTime value. By checking the presence of the glowAnimationID value, we decide whether we should display the glow or hide it completely. MoveKeyframe allows to set the initial value for elapsedTime, and LinearKeyframe allows to change this value to a new one for the specified time interval.
So basically when glowAnimationID is not nil, we change the value of elapsedTime from 0.0 to 1.0 in 0.4 seconds and vice versa.
keyframes: { _ in
  if glowAnimationID != nil {
    MoveKeyframe(.zero)
    LinearKeyframe(
      1.0,
      duration: 0.4
    )
  } else {
    MoveKeyframe(1.0)
    LinearKeyframe(
      .zero,
      duration: 0.4
    )
  }
}
We also need to update the gesture handling by assigning a new animation identifier each time the user starts a new gesture cycle.
.updating(
  $dragState,
  body: { gesture, state, _ in
    switch state {
    case .inactive:
      dragLocation = gesture.location
      glowAnimationID = UUID()

      state = .dragging
    case .dragging:
      ...
    }
  }
)
And clear the identifier as soon as the user completes the gesture cycle.
.updating(
  $dragState,
  body: { gesture, state, _ in ... }
)
.onEnded { _ in
  glowAnimationID = nil
}
Well, there is a huge work done at the moment.
One third of our animation is done, moving further.
Ripple wave
Recent revisions of SwiftUI are marked by increased attention from Apple making Metal look not so scary and be easy to integrate with UI components. Thus WWDC24 features this great tutorial about creating custom visual effects, which contains the exact ripple effect we want to get.
Here is one of the sessions demonstrating wide options for creating custom visual effects in SwiftUI.
Let’s get better understanding of the math behind this shader.
First we calculate the distance between the origin of the wave and some point on the view.
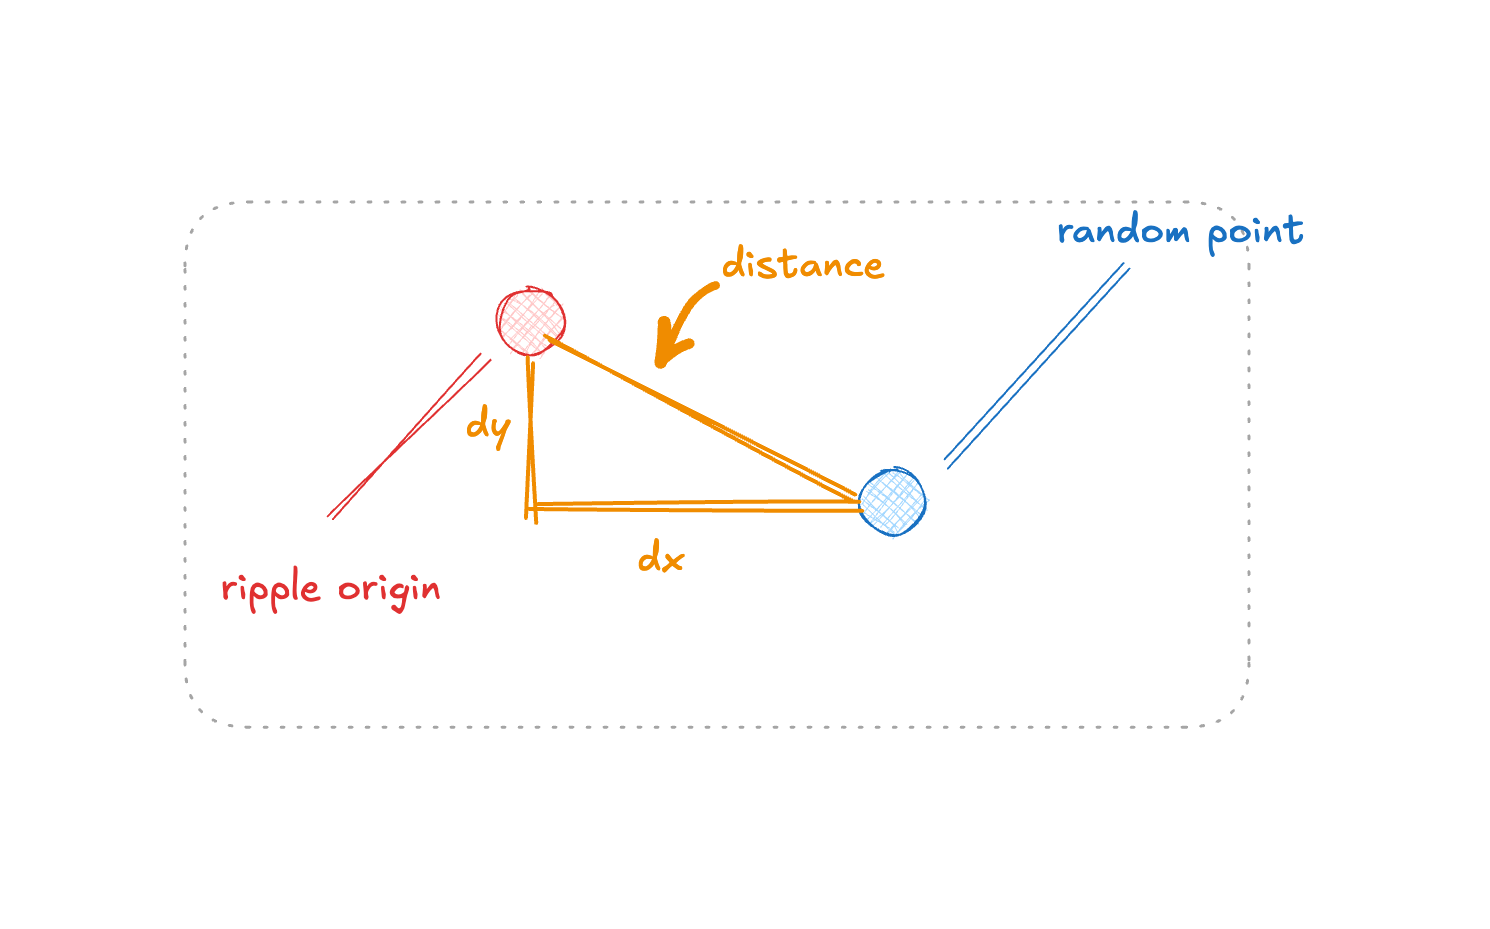
float distance = length(position - origin);Next, we model the time it takes for the wave to reach a point on the view. If the point is too far from the origin (i.e., if the delay is greater than the current time), we clamp the value to zero, indicating no ripple effect at that distance. Essentially, a higher speed results in a lower delay, leading to wider wave propagation per second, which means more pixels are affected by the ripple.
float delay = distance / speed;
time = max(0.0, time - delay);
Next, we define the main value of this effect: the ripple amount. In this example, its heartbeat is determined by a sine function of time. The frequency modulates the number of peaks, while the amplitude defines the height of these peaks. An exponential decay function helps gradually diminish the effect over time.
float rippleAmount = amplitude * sin(frequency * time) * exp(-decay * time);Here is graphtoy link to better understand the function composition. The graph shows that the resulting function value quickly rises (indicated by the brighter pixels of the wave) in a short period, then gradually decreases as the wave fades. As a result, we will have one peak with bright values representing a wave moving from the touch location to the view borders.
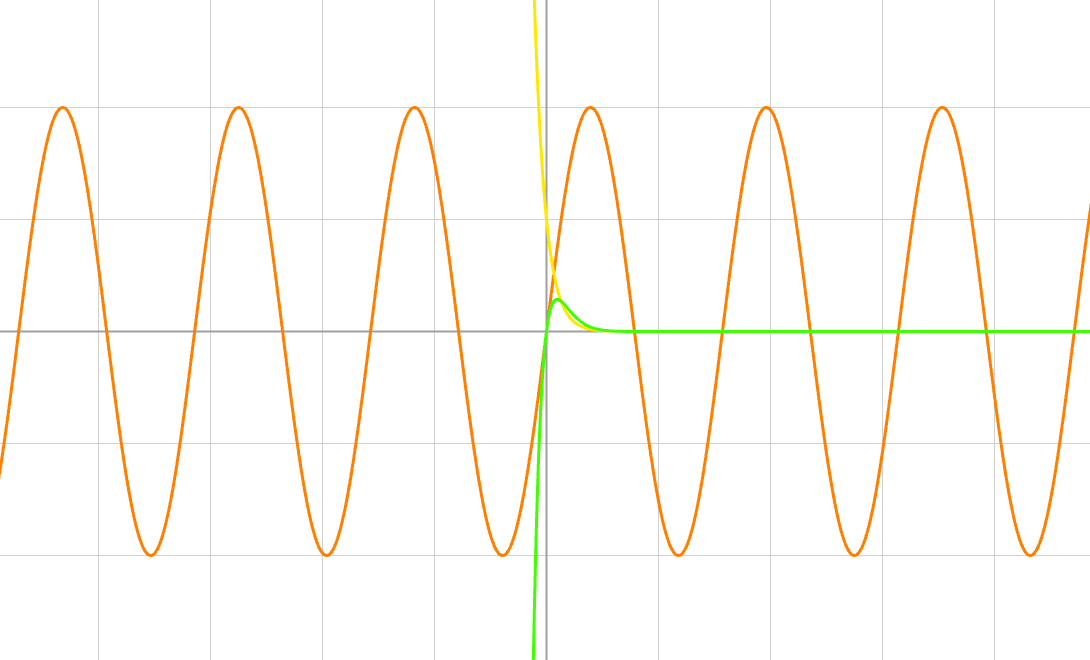
Although graphtoy provides its own variable for time, we do not use it when explaining formulas. Our time variable is represented by values on Ox.
This part might be tricky: newPosition is the coordinate of a pixel on the screen that will replace the current pixel. This creates a distortion effect, which becomes more pronounced with higher values of frequency and amplitude.
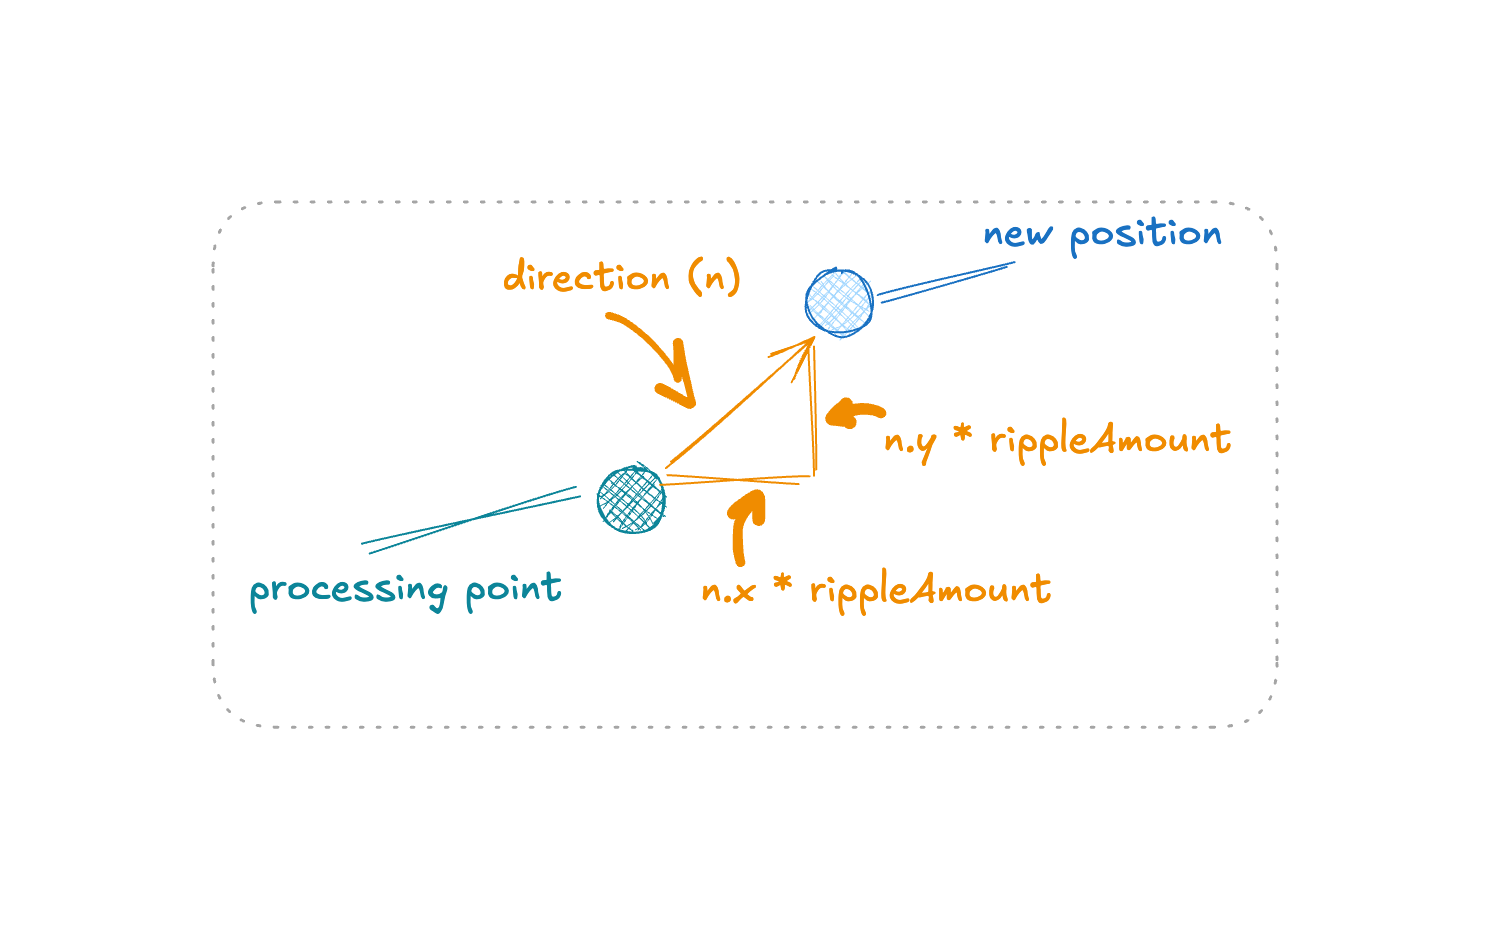
float2 direction = normalize(position - origin);
float2 newPosition = position + rippleAmount * direction;
After that, we use newPosition to retrieve the replacement pixel, specifically its color information.
half4 color = layer.sample(newPosition);All that’s left is to model the color brightness proportional to the ripple’s magnitude and the current alpha of that color.
color.rgb += (rippleAmount / amplitude) * color.a;
return color;
Here is the complete code of this shader from the Apple’s tutorial. Note that the interface of this function is also built in a special way, in SwiftUI it corresponds to the layerEffect call.
#include <SwiftUI/SwiftUI.h>
#include <metal_stdlib>

using namespace metal;

[[ stitchable ]]
half4 ripple(
  float2 position,
  SwiftUI::Layer layer,
  float2 origin,
  float time,
  float amplitude,
  float frequency,
  float decay,
  float speed
) {
  // The distance of the current pixel position from `origin`.
  float distance = length(position - origin);

  // The amount of time it takes for the ripple to arrive at the current pixel position.
  float delay = distance / speed;

  // Adjust for delay, clamp to 0.
  time = max(0.0, time - delay);

  // The ripple is a sine wave that Metal scales by an exponential decay function.
  float rippleAmount = amplitude * sin(frequency * time) * exp(-decay * time);

  // A vector of length `amplitude` that points away from position.
  float2 direction = normalize(position - origin);

  // Scale `n` by the ripple amount at the current pixel position and add it
  // to the current pixel position.
  //
  // This new position moves toward or away from `origin` based on the
  // sign and magnitude of `rippleAmount`.
  float2 newPosition = position + rippleAmount * direction;

  // Sample the layer at the new position.
  half4 color = layer.sample(newPosition);

  // Lighten or darken the color based on the ripple amount and its alpha component.
  color.rgb += (rippleAmount / amplitude) * color.a;

  return color;
}
Next same as with glow we declare a view modifier and duplicate all the properties from the shader interface.
struct RippleModifier: ViewModifier {
  let origin: CGPoint
  let elapsedTime: TimeInterval
  let duration: TimeInterval
  let amplitude: Double
  let frequency: Double
  let decay: Double
  let speed: Double

  func body(content: Content) -> some View { ... }
}
We start the body of the modifier by invoking the shader library to create an instance of the shader function.
func body(content: Content) -> some View {
  let shader = ShaderLibrary.default.ripple(
    .float2(origin),
    .float(elapsedTime),
    .float(amplitude),
    .float(frequency),
    .float(decay),
    .float(speed)
  )
}
And we complete it by creating a shader effect in the visualEffect wrapper to allow SwiftUI to perform animations without affecting the layout of the elements.
func body(content: Content) -> some View {
  ...

  let maxSampleOffset = CGSize(
    width: amplitude,
    height: amplitude
  )
  let elapsedTime = elapsedTime
  let duration = duration

  content.visualEffect { view, _ in
    view.layerEffect(
      shader,
      maxSampleOffset: maxSampleOffset,
      isEnabled: 0...duration ~= elapsedTime
    )
  }
}
Timing the ripple
For the final step, we need to link user actions with the shader call. Let’s add an identifier for the ripple animation and a separate variable to track the initial touch point.
struct ReactiveControl: View {
  @State private var rippleAnimationID: UUID?
  @State private var rippleLocation: CGPoint?

  ...
}
Apply keyframeAnimator to the lowest view in the hierarchy. The ripple parameters used here create a uniform wave that roughly aligns with the rest of the animation we’re developing. We can also add sensoryFeedback here to give the effect even more impact.
ZStack {
  Capsule()
    .fill(.black)
    .keyframeAnimator(
      initialValue: 0,
      trigger: rippleAnimationID,
      content: { view, elapsedTime in
        view.modifier(
          RippleModifier(
            origin: rippleLocation ?? .zero,
            elapsedTime: elapsedTime,
            duration: 1.0,
            amplitude: 2.0,
            frequency: 4.0,
            decay: 10.0,
            speed: 800.0
          )
        )
      },
      keyframes: { _ in ... }
    )
    .sensoryFeedback(
      .impact,
      trigger: rippleAnimationID
    )
 ...
}
The keyframes describe the ripple motion in only one direction, as we start the animation when the user first touches the screen.
keyframes: { _ in
  MoveKeyframe(.zero)
  LinearKeyframe(
    1.0,
    duration: 2.0
  )
}
To trigger the animation, we update the gesture handling callback for the inactive state by assigning a new identifier for the ripple and setting the location of the touch.
.updating(
  $dragState,
  body: { gesture, state, _ in
    switch state {
    case .inactive:
      rippleAnimationID = UUID()
      rippleLocation = gesture.location

      ...
    case .dragging:
   ...
    }
  }
)
And that’s it! Now we can check the animation.
Particle cloud
To draw a particle cloud, we first need to understand its mathematics. Each particle is described by its location, velocity, and lifespan. For UI purposes, we can also include radius and color in this set.
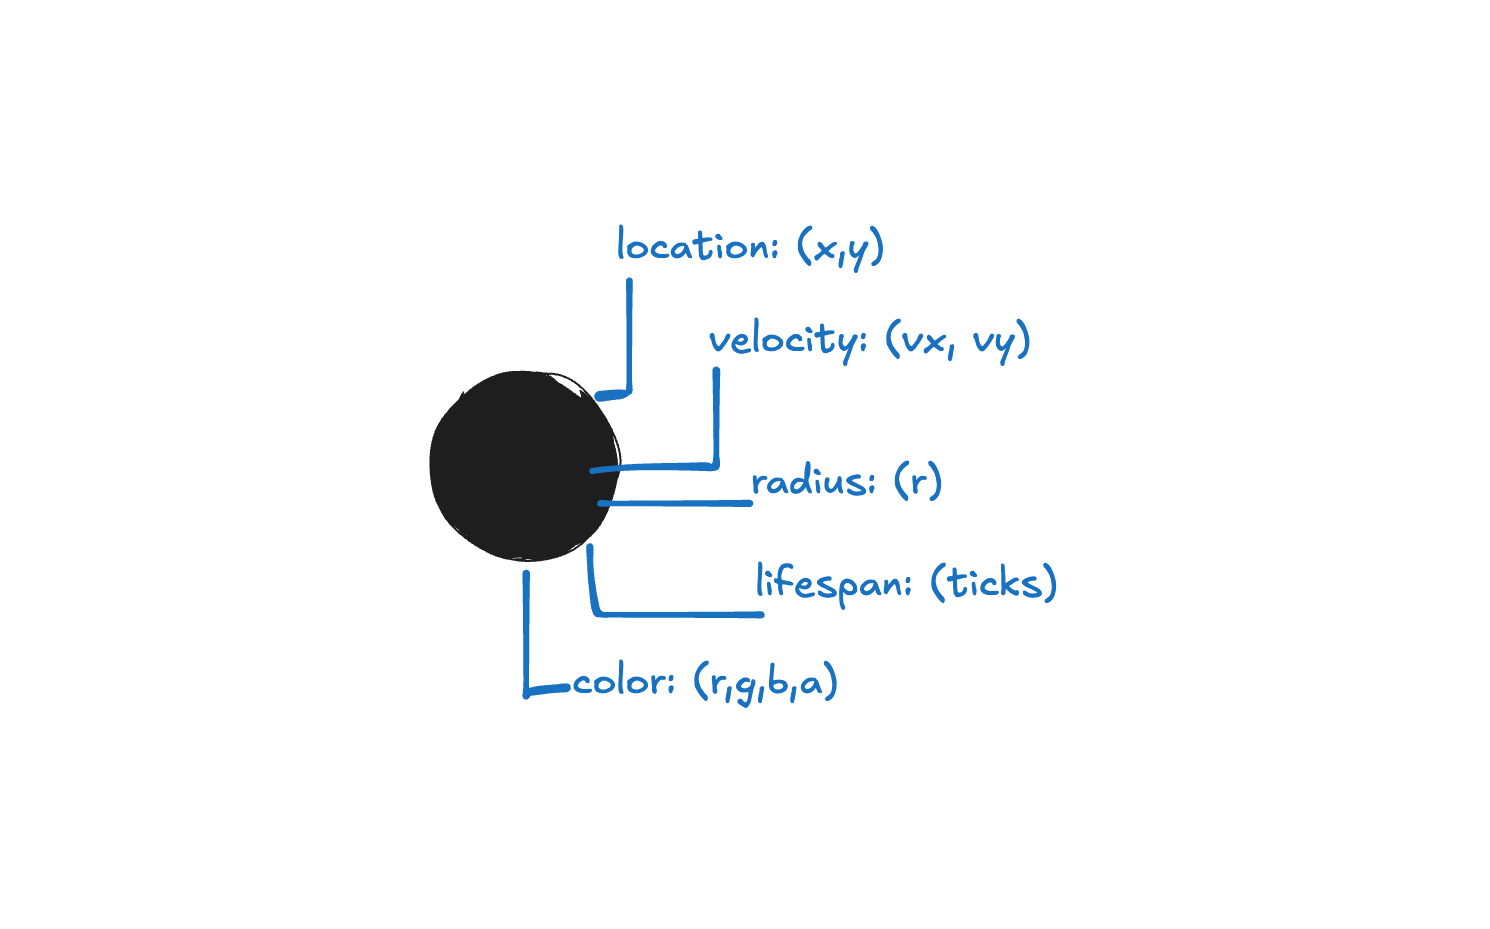
For the particle cloud, we will maintain its center, which is defined by the user’s touch location. Based on this point, we can calculate the direction of motion for each particle.
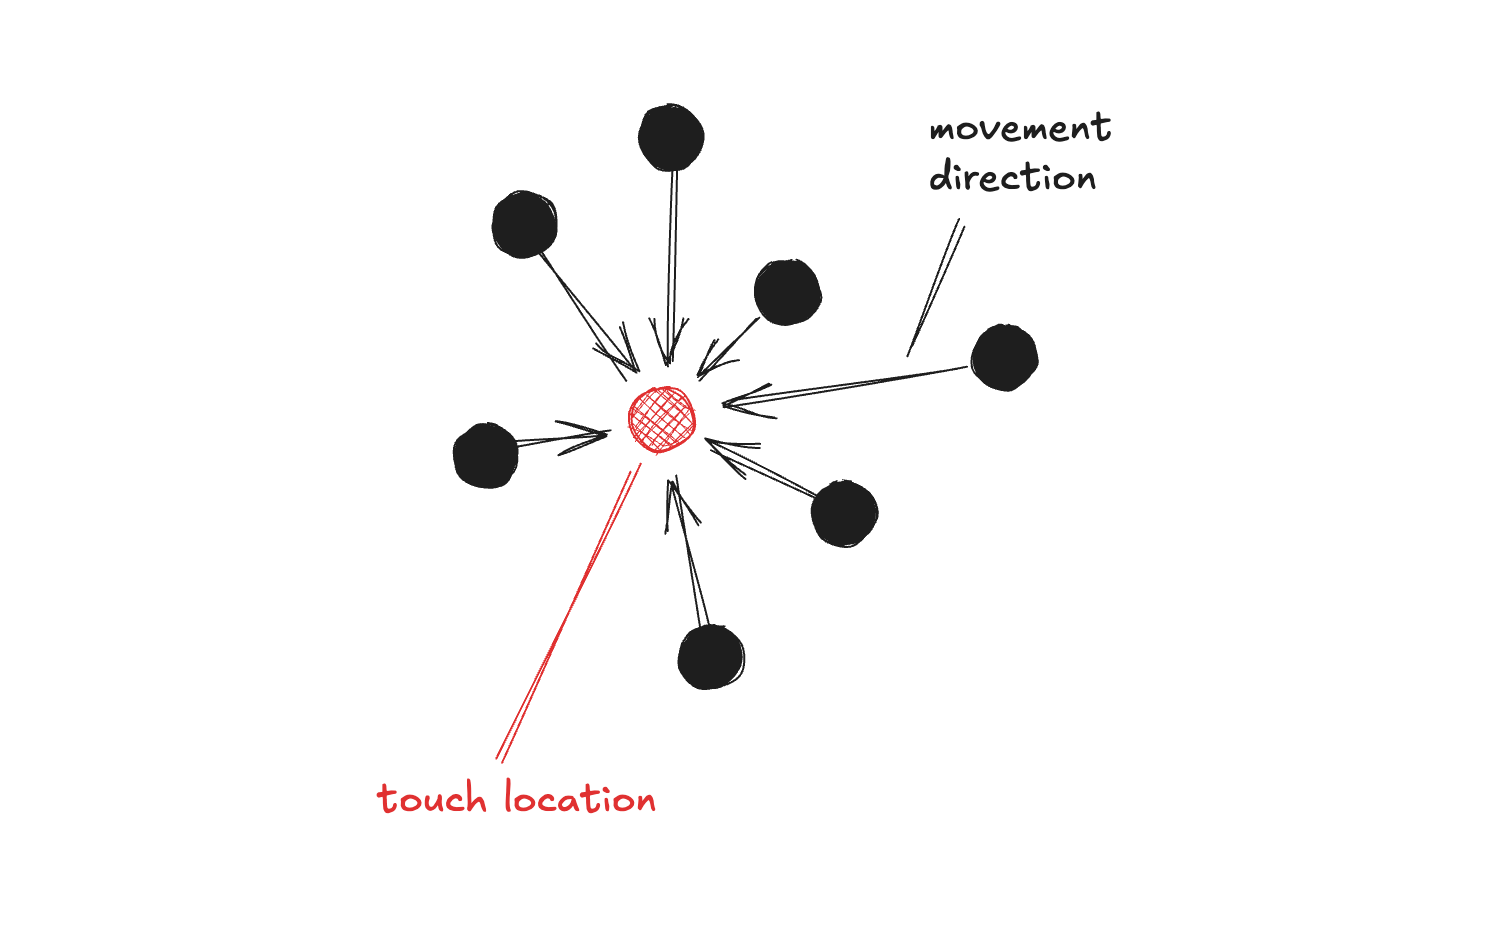
Begin by defining structures for the described concepts. The SIMD types are vectors, so you can consider SIMD2<Float> in Swift and float2 in Metal as the identical type. The progress variable in ParticleCloudInfo has the same definition as the one we’ve described for the glowing effect.
struct Particle {
  let color: SIMD4<Float>
  let radius: Float
  let lifespan: Float
  let position: SIMD2<Float>
  let velocity: SIMD2<Float>
}

struct ParticleCloudInfo {
  let center: SIMD2<Float>
  let progress: Float
}
To implement the described behavior, the existing options for interaction between SwiftUI and Metal are insufficient. We need to go a bit deeper and leverage the interaction between UIKit and MetalKit. Declare a UIViewRepresentable conforming type to adapt an MTKView instance for use in SwiftUI.
import MetalKit

struct ParticleCloud: UIViewRepresentable {
  let center: CGPoint?
  let progress: Float

  private let metalView = MTKView()

  func makeUIView(context: Context) -> MTKView {
    metalView
  }

  func updateUIView(
    _ view: MTKView,
    context: Context
  ) {}
}
To draw on the MTKView instance, we need to create a type that conforms to MTKViewDelegate. The Renderer will manage everything needed to display the particles. First, we’ll add a reference to MTKView and a variable for the touch point, which will be in normalized values. By default, we will assume the touch is at the center of the view.
We also maintain a progress variable here, defined similarly to the one in the glow shader. It affects the entire cloud based on whether the touch animation starts or ends. If progress is zero, we disable particle rendering and hide them.
final class Renderer: NSObject {
  var center = CGPoint(x: 0.5, y: 0.5)

  var progress: Float = 0.0 {
    didSet {
      metalView?.isPaused = progress == .zero
    }
  }

  private weak var metalView: MTKView?

  init(metalView: MTKView) {
    self.metalView = metalView
  }
}
Next, we will manually configure the interaction between UIKit and MetalKit. The core of this interaction is the MTLDevice type, which represents an instance of the GPU on the device and allows us to send commands for execution. We obtain a such one by calling MTLCreateSystemDefaultDevice.
To send commands, MTLDevice provides an intermediary called MTLCommandQueue. This can be roughly compared to GCD, where DispatchQueue serves as a command sender.
final class Renderer: NSObject {
  ...

  private let commandQueue: MTLCommandQueue

  init(metalView: MTKView) {
    ...

    guard
      let device = MTLCreateSystemDefaultDevice(),
      let commandQueue = device.makeCommandQueue()
    else {
      fatalError("GPU not available")
    }

    self.commandQueue = commandQueue
  }
}
Next, we need to create a representation of Metal functions, which is similar to what we have in SwiftUI. First, we create an MTLLibrary using a bundle that contains the expected Metal functions, and then we build these functions using their names. We don’t have the functions yet, but we’ll address that shortly.
To use the described functions, we create a pipeline state, specifically instances of the MTLComputePipelineState type. You can think of a pipeline state as a brush that the GPU uses for rendering — different brushes yield different rendering results.
final class Renderer: NSObject {
  ...

  private let cleanState: MTLComputePipelineState
  private let drawState: MTLComputePipelineState

  init(metalView: MTKView) {
    ...

    do {
      let library = try device.makeDefaultLibrary(
        bundle: .main
      )

      let clearFunc = library.makeFunction(
        name: "cleanScreen"
      )!
      let drawFunc = library.makeFunction(
        name: "drawParticles"
      )!

      cleanState = try device.makeComputePipelineState(
        function: clearFunc
      )
      drawState = try device.makeComputePipelineState(
        function: drawFunc
      )
    } catch {
      fatalError("Library not available: \(error)")
    }

    super.init()
  }
}
We also need to set up the particle data. Here, you’ll find predefined values that align with existing animations, but feel free to input your own to better understand how the pipeline operates.
To track the progress of rendering and correctly set particle dynamics, we store this data locally. The shader code will fully process and update this data. To make it accessible to the shader, we store it as an MTLBuffer instance.
The builder we use accepts a bytes pointer and the size of the memory at that pointer. Providing these parameters allows Metal to properly allocate memory for the parameters during shader execution.
final class Renderer: NSObject {
  ...

  private var particleBuffer: MTLBuffer!

  var particleCount: Int = 32

  var colors: [SIMD4<Float>] = Array(
    repeating: .init(
      Float.random(in: 0.0..<0.3),
      Float.random(in: 0.3..<0.7),
      Float.random(in: 0.7..<1.0),
      1.0
    ),
    count: 3
  )

  init(metalView: MTKView) {
    ...

    let particles: [Particle] = (0..<particleCount).map { i in
      let vx = Float(5.0)
      let vy = Float(5.0)

      return Particle(
        color: colors[i % colors.count],
        radius: Float.random(in: 4..<30),
        lifespan: .zero,
        position: SIMD2<Float>(.zero, .zero),
        velocity: SIMD2<Float>(vx, vy)
      )
    }

    particleBuffer = device.makeBuffer(
      bytes: particles,
      length: MemoryLayout<Particle>.stride * particleCount
    )
  }
}
Lastly, we need to inform MTKView that the renderer we are describing will serve as its delegate. We also set the backgroundColor to clear to prevent UIView behavior from affecting the shader and disable frame buffer to allow the further operations we are about to implement.
final class Renderer: NSObject {
  ...

  init(metalView: MTKView) {
    ...

    metalView.device = device
    metalView.delegate = self
    metalView.framebufferOnly = false
    metalView.backgroundColor = .clear
  }
}
Conforming MTKViewDelegate requires the implementation of two methods, in the article we will focus only on draw.
extension Renderer: MTKViewDelegate {
  func draw(in view: MTKView) { ... }

  func mtkView(
    _ view: MTKView,
    drawableSizeWillChange size: CGSize
  ) {}
}
The draw method represents a single draw cycle, similar to what can be found, for example, in UIView.
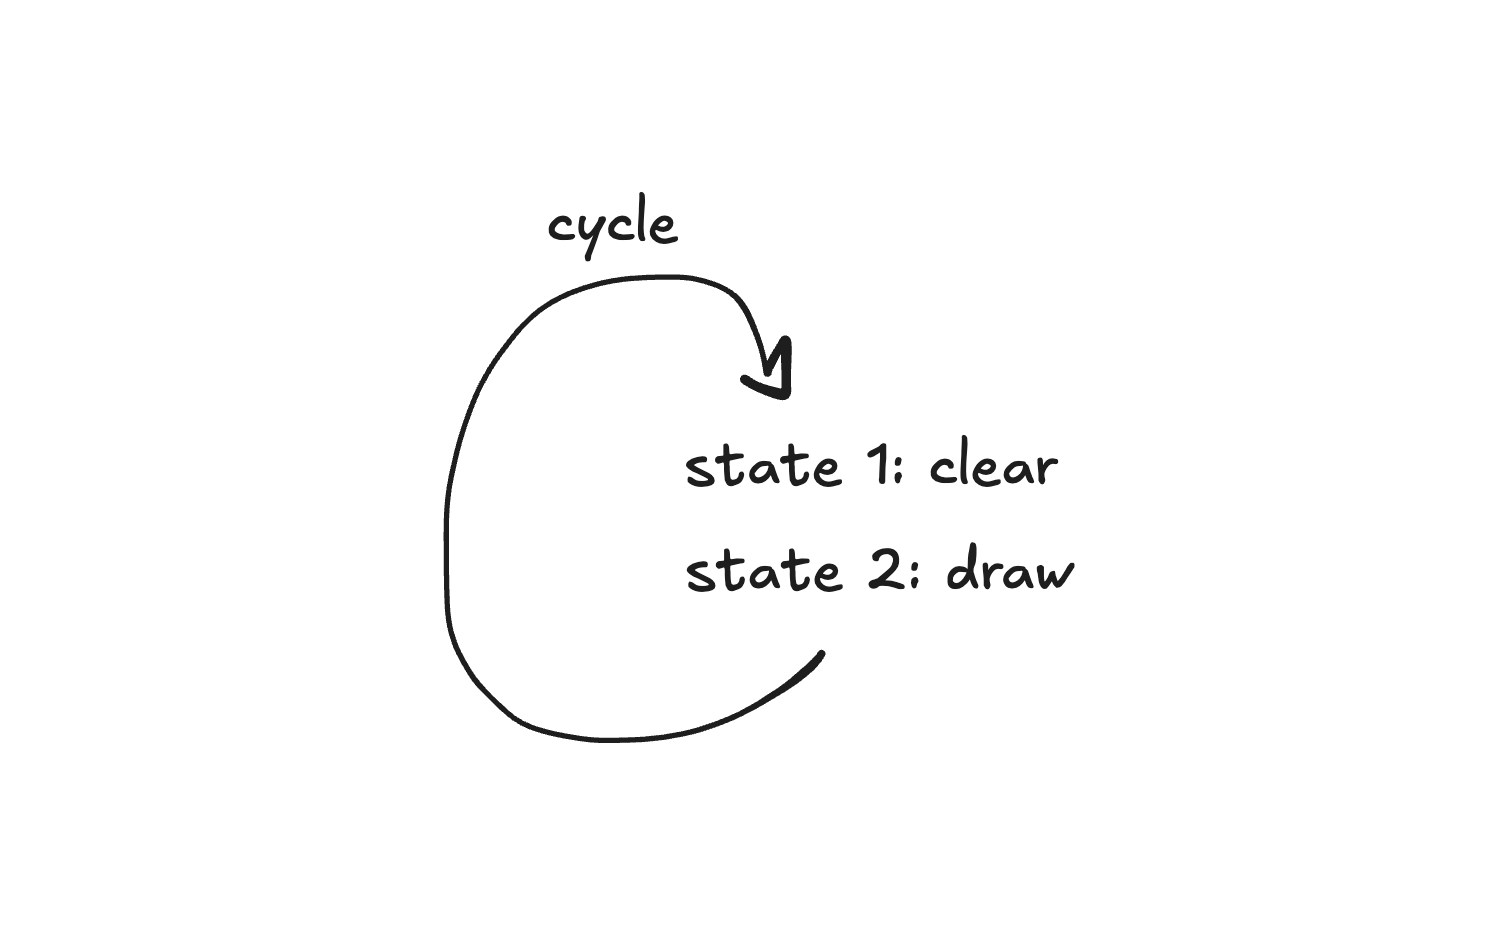
We start by setting up the core elements for the rendering pass. The drawable serves as the canvas for our drawings, while the texture contains the colors and content. To group all commands for a single rendering cycle, we use a commandBuffer from the commandQueue. Finally, the commandEncoder translates Swift method calls into Metal instructions. At the very end, we set the texture in the encoder, which it will pass to the Metal shaders.
func draw(in view: MTKView) {
  guard let drawable = view.currentDrawable else { return }

  let texture = drawable.texture

  let commandBuffer = commandQueue.makeCommandBuffer()
  let commandEncoder = commandBuffer?.makeComputeCommandEncoder()

  commandEncoder?.setTexture(texture, index: 0)
}
Next we have to code the states for the drawing cycle. The first is clearState, whose task is to clear the canvas - to erase particles that may have been left after the previous drawing cycle. We passed the texture for the work earlier, but we will leave all the code of clearing in the shader. Here we need to tell it how to process the canvas correctly from the point of view of the device’s computational capabilities.
By calling dispatchThreads, we instruct the encoder to apply the current state. The first parameter specifies the total number of elements to process, calculated in three dimensions. Since we are working with a 2D image, we only need to provide the canvas width and height.
The second parameter defines how many elements the device processes at once. Since resources are limited, the GPU processes these elements in groups. For more complex tasks, this helps optimize the workload and improve performance. In our example, we can rely on the base values provided by the device. We use threadExecutionWidth as the number of threads in a horizontal group, and calculate the group's height by dividing the total area (maxTotalThreadsPerThreadgroup`) by the width.
func draw(in view: MTKView) {
  ...

  commandEncoder?.setComputePipelineState(cleanState)

  let w = cleanState.threadExecutionWidth
  let h = cleanState.maxTotalThreadsPerThreadgroup / w

  commandEncoder?.dispatchThreads(
    MTLSize(
      width: texture.width,
      height: texture.height,
      depth: 1
    ),
    threadsPerThreadgroup: MTLSize(
      width: w,
      height: h,
      depth: 1
    )
  )
}
By using dispatchThreads, we don’t need to worry about whether the number of processed elements matches the number of threads in a group. Metal automatically handles this, provided the processor architecture supports nonuniform sizes. If the architecture misses such option option, calling the method will result in a runtime error. In this case, take into account size nonuniformity in calculations and call dispatchThreadgroups.
This part of the code is provided for demonstration purposes, do not add it to the project. If at the end you get the above error when running the shader, come back here and use this code.
commandEncoder?.dispatchThreadgroups(
  MTLSize(
    width: texture.width,
    height: texture.height,
    depth: 1
  ),
  threadsPerThreadgroup: MTLSize(
    width: (texture.width + w - 1) / w,
    height: (texture.height + h - 1) / h,
    depth: 1
  )
)
Next we encode the drawState. The first step after a state change is setting the particle buffer. Using setBuffer, we give the Metal shader a reference to this buffer, allowing it to read and write particle data. Then we prepare the cloud information and pass it using setBytes, which copies the data directly to the GPU. This is sufficient since the shader will not modify this structure.
The final step in setting up this state is to call dispatchThreads again, but this time the number of elements corresponds to the number of particles we want to display. The number of threads in one thread group will also remain the default value.
func draw(in view: MTKView) {
  ...

  commandEncoder?.setComputePipelineState(drawState)

  commandEncoder?.setBuffer(
    particleBuffer,
    offset: 0,
    index: 0
  )

  var info = ParticleCloudInfo(
    center: SIMD2<Float>(Float(center.x), Float(center.y)),
    progress: progress
  )

  commandEncoder?.setBytes(
    &info,
    length: MemoryLayout<ParticleCloudInfo>.stride,
    index: 1
  )

  commandEncoder?.dispatchThreads(
    MTLSize(
      width: particleCount,
      height: 1,
      depth: 1
    ),
    threadsPerThreadgroup: MTLSize(
      width: drawState.threadExecutionWidth,
      height: 1,
      depth: 1
    )
  )
}
Same consideration regarding nonuniform dimensions.
This part of the code is provided for demonstration purposes, do not add it to the project. If at the end you get the above error when running the shader, come back here and use this code.
commandEncoder?.dispatchThreadgroups(
  MTLSize(
    width: (particleCount + w - 1) / w,
    height: 1,
    depth: 1
  ),
  threadsPerThreadgroup: MTLSize(
    width: drawState.threadExecutionWidth,
    height: 1,
    depth: 1
  )
)
The final step in our rendering cycle is to finish encoding, present the current drawable, and send the commands for processing.
func draw(in view: MTKView) {
  ...

  commandEncoder?.endEncoding()
  commandBuffer?.present(drawable)
  commandBuffer?.commit()
}
Before returning to writing the shader, let’s integrate the Renderer into the ParticleCloud description. When creating and updating the view, we assign a progress animation to ensure particle rendering stays up to date. We also pre-normalize the touch point so that the shader remains independent of the view’s dimensions.
struct ParticleCloud: UIViewRepresentable {
  ...

  func makeUIView(
    context: Context
  ) -> MTKView {
    context.coordinator.progress = progress

    return metalView
  }

  func updateUIView(
    _ view: MTKView,
    context: Context
  ) {
    context.coordinator.progress = progress

    guard let center else { return }

    let bounds = view.bounds

    context.coordinator.center = CGPoint(
      x: center.x / bounds.width,
      y: center.y / bounds.height
    )
  }

  func makeCoordinator() -> Renderer {
    Renderer(metalView: metalView)
  }
}
Shading the cloud
The first step is to duplicate the structure descriptions, making them accessible to the shaders.
struct Particle {
  float4 color;
  float radius;
  float lifespan;
  float2 position;
  float2 velocity;
};

struct ParticleCloudInfo {
  float2 center;
  float progress;
};
Next, we’ll describe the shader for clearing the canvas. The parameters include the output texture for processing, which is accessed using the [[texture]] attribute. This attribute refers to the parameter table set earlier in the draw method, with the texture located at index 0. The id parameter corresponds to the index of the processing thread and the element being processed.
To clear the canvas, we set each pixel to transparent using half4(0), which returns a color where all components are set to 0.
kernel void cleanScreen (
  texture2d<half, access::write> output [[ texture(0) ]],
  uint2 id [[ thread_position_in_grid ]]
) {
  output.write(half4(0), id);
}
Let’s move on to drawing the particles. Together with the texture we extract data about particles and the whole cloud from the buffer, their indices coincide with those specified earlier in the draw method.
With the first operation we convert the normalised centre position values to texture coordinates, so that we can work with pixels further.
kernel void drawParticles (
  texture2d<half, access::write> output [[ texture(0) ]],
  device Particle *particles [[ buffer(0) ]],
  constant ParticleCloudInfo &info [[ buffer(1) ]],
  uint id [[ thread_position_in_grid ]]
) {
  float2 uv_center = info.center;

  float width = output.get_width();
  float height = output.get_height();

  float2 center = float2(width * uv_center.x, height * uv_center.y);
}
Next, we define the rules for particle motion. Remember that the id parameter corresponds to the current element, using it we get data about the particle from the buffer.
By default, we set three conditions for a particle’s “rebirth”:
If it is too close to the center. If it has just appeared (its coordinates are equal to 0.0). If its lifetime exceeds 100 ticks. In case one of the conditions is fulfilled, we assign the particle a random position within texture boundaries and reset its lifetime. Otherwise we move it towards the centre and increase its tick by one.
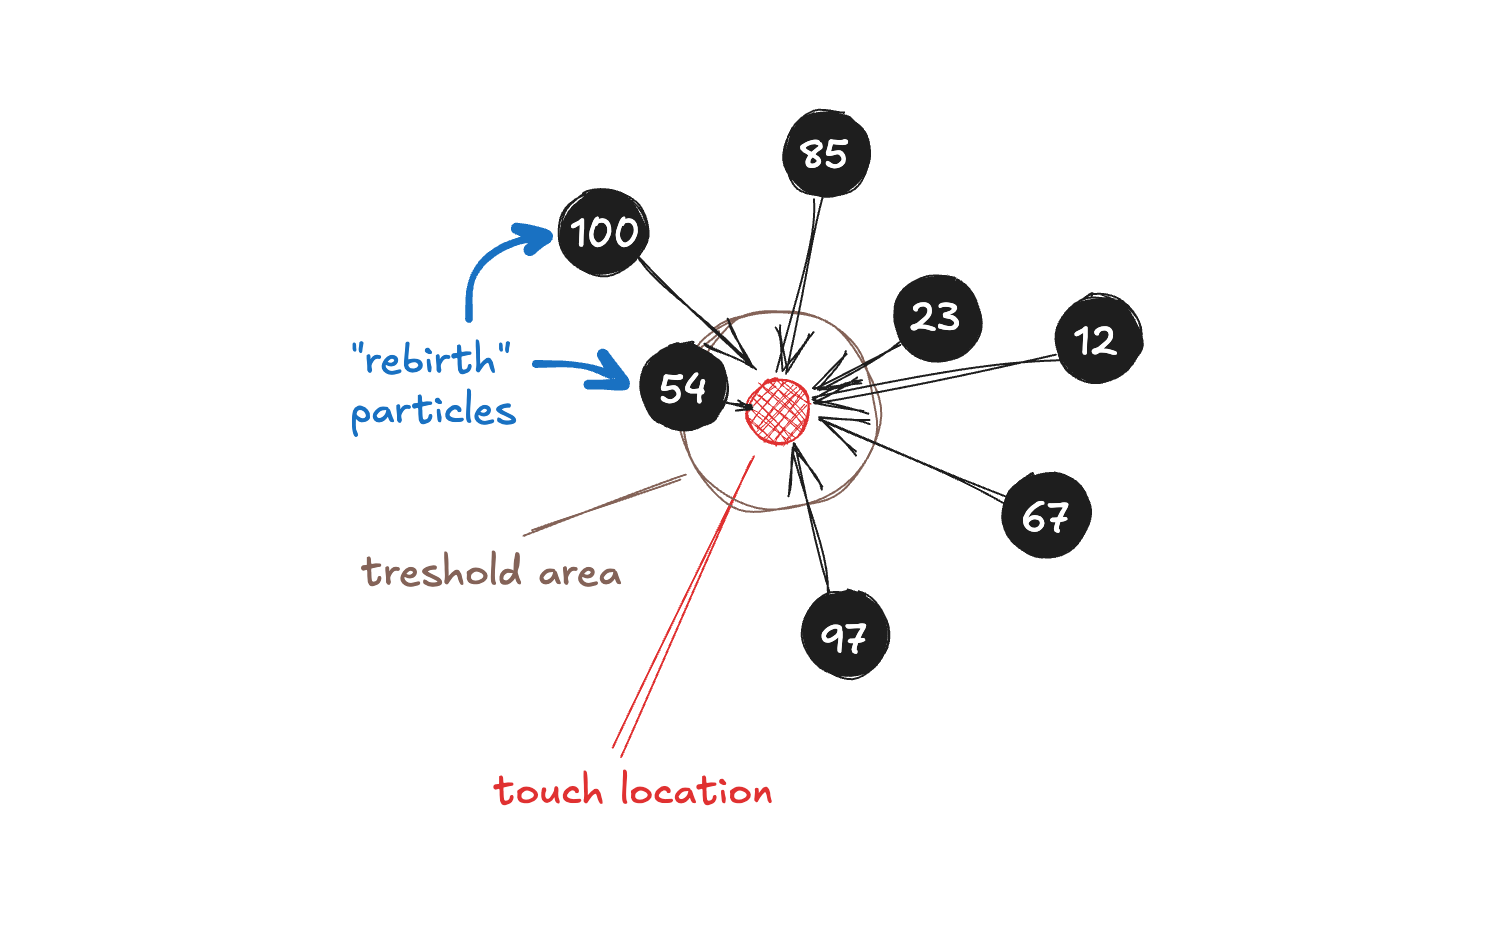
After computing the updated data, we update the particle and store it back into the buffer.
kernel void drawParticles (
  texture2d<half, access::write> output [[ texture(0) ]],
  device Particle *particles [[ buffer(0) ]],
  constant ParticleCloudInfo &info [[ buffer(1) ]],
  uint id [[ thread_position_in_grid ]]
) {
  ...

  Particle particle = particles[id];

  float lifespan = particle.lifespan;
  float2 position = particle.position;
  float2 velocity = particle.velocity;

  if (
    length(center - position) < 20.0 ||
    position.x == 0.0 && position.y == 0.0 ||
    lifespan > 100
  ) {
    position = float2(rand(id) * width, rand(id + 1) * height);
    lifespan = 0;
  } else {
    float2 direction = normalize(center - position);
    position += direction * length(velocity);
    lifespan += 1;
  }

  particle.lifespan = lifespan;
  particle.position = position;

  particles[id] = particle;
}
The rand function provides some pseudorandom values in range from 0.0 to 1.0, which is enough for our control.
float rand(int passSeed)
{
  int seed = 57 + passSeed * 241;
  seed = (seed << 13) ^ seed;
  seed = (seed * (seed * seed * 15731 + 789221) + 1376312589) & 2147483647;
  seed = (seed * (seed * seed * 48271 + 39916801) + 2147483647) & 2147483647;
  return ((1.f - (seed / 1073741824.0f)) + 1.0f) / 2.0f;
}
Now, we need to draw the particles. The lifetime of each particle determines its color intensity as it moves across the canvas, while the overall progress affects the color intensity of all particles in the cloud. This progress is controlled by a touch animation that begins when the user touches the screen and ends when they release it.
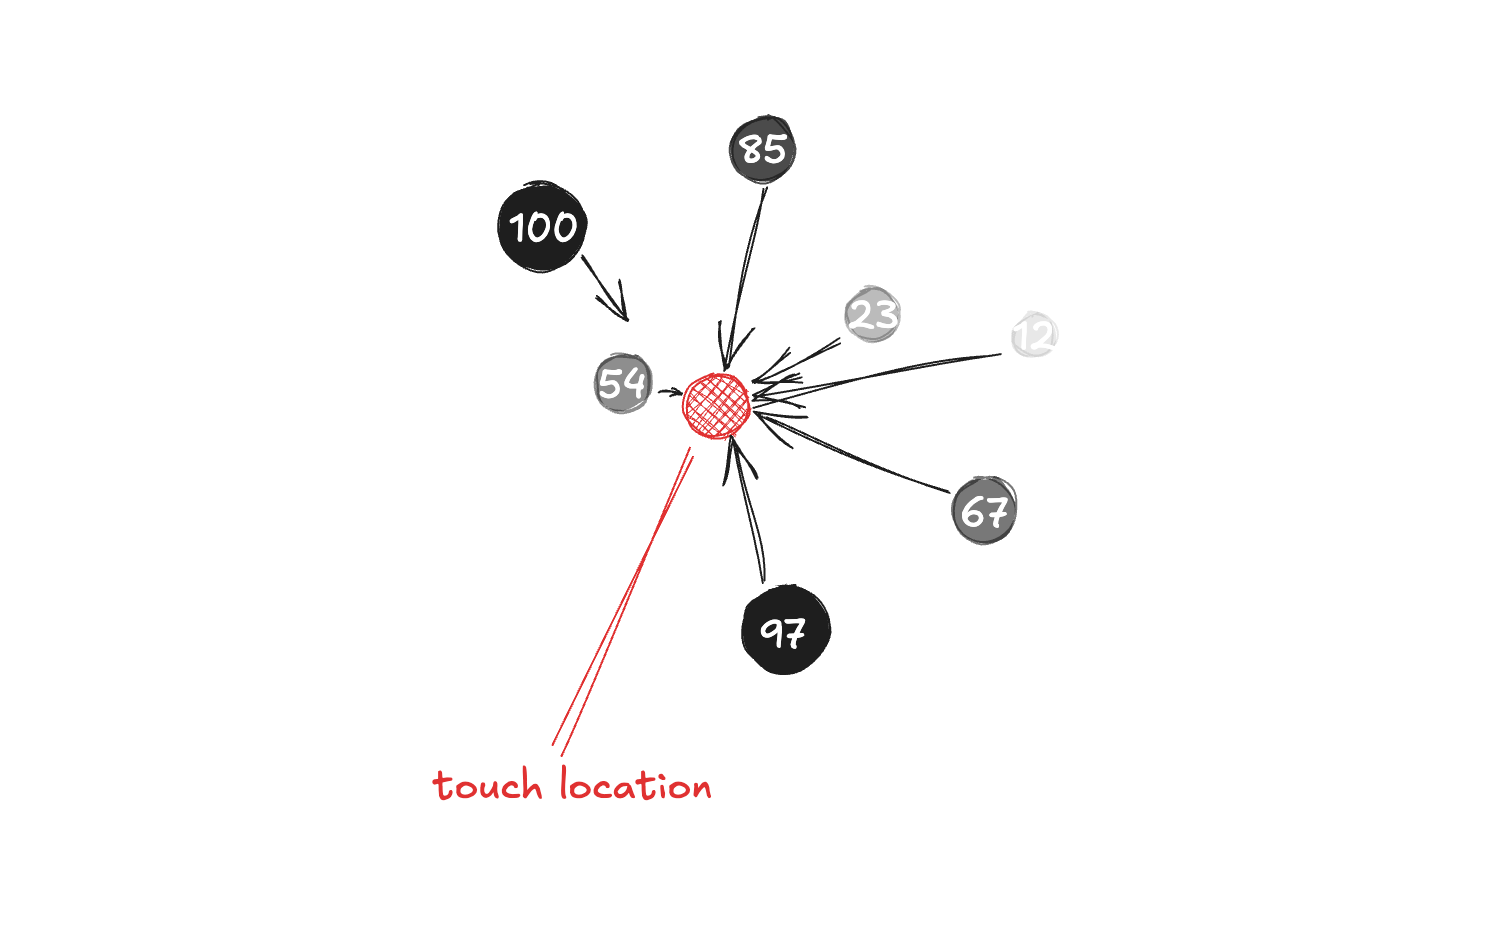
To draw, we iterate over the pixels in a 200 by 200 square and render only those pixels that fall within the circle.
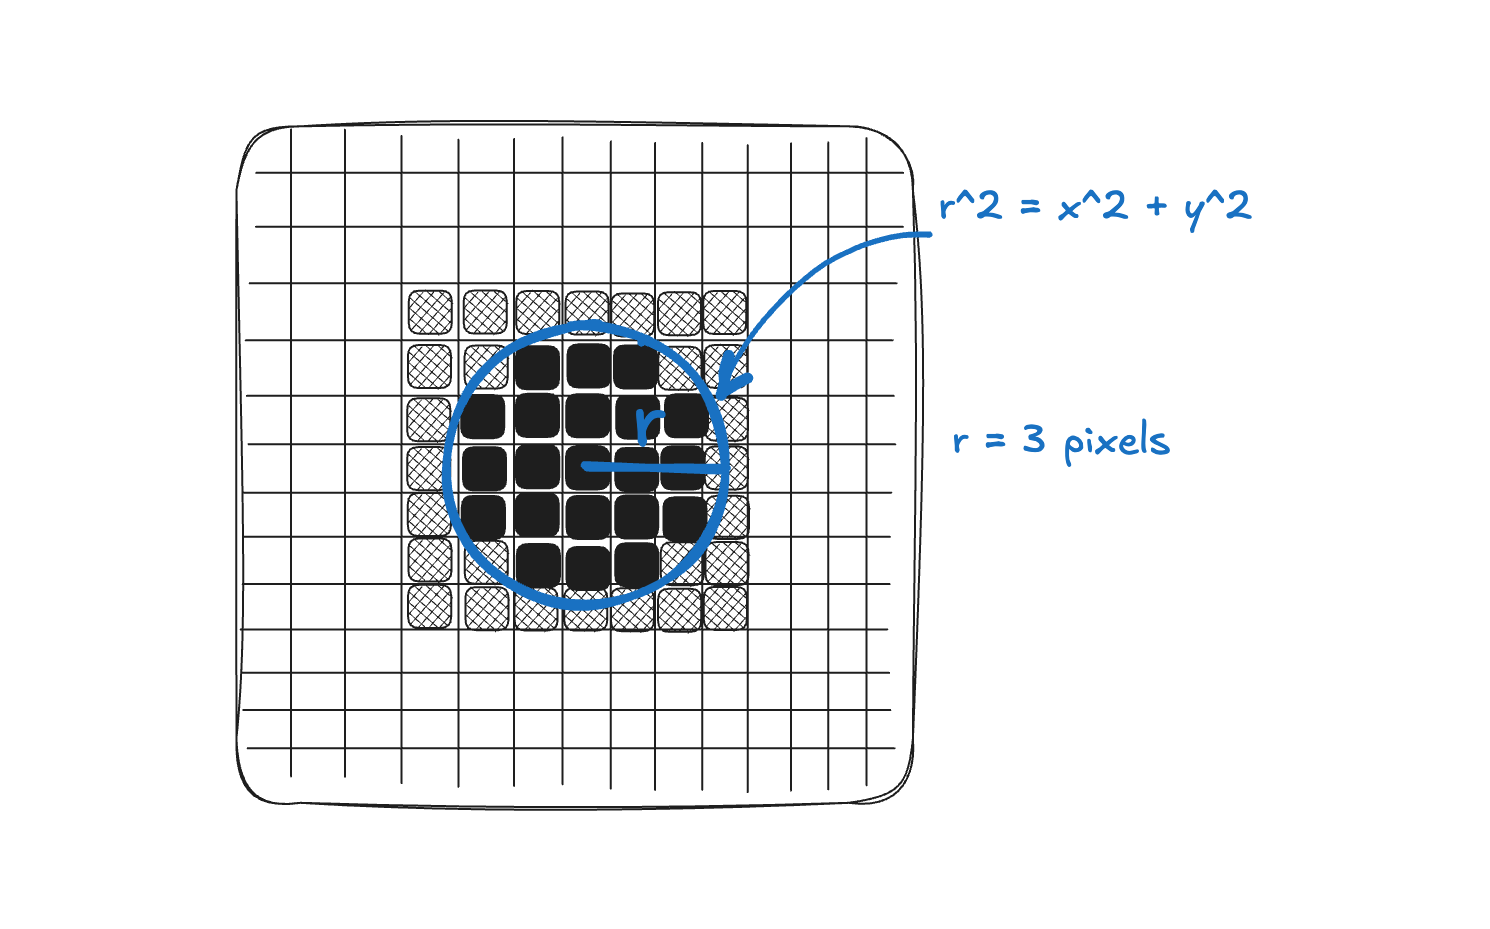
In the implementation, instead of using the pixel’s coordinates to calculate the radius, we use its sequence number in the for loop.
kernel void drawParticles (
  texture2d<half, access::write> output [[ texture(0) ]],
  device Particle *particles [[ buffer(0) ]],
  constant ParticleCloudInfo &info [[ buffer(1) ]],
  uint id [[ thread_position_in_grid ]]
) {
  ...

  half4 color = half4(particle.color) * (lifespan / 100) * info.progress;
  uint2 pos = uint2(position.x, position.y);

  for (int y = -100; y < 100; y++) {
    for (int x = -100; x < 100; x++) {
      float s_radius = x * x + y * y;
      if (sqrt(s_radius) <= particle.radius * info.progress) {
        output.write(color, pos + uint2(x, y));
      }
    }
  }
}
Timing the cloud
Returning to SwiftUI, we now need to animate the particle cloud using keyframes. Since we declared ParticleCloud as a view rather than a view modifier, we wrap it in keyframes differently by using the KeyframeAnimator instance directly. This is the only difference; otherwise, the content and logic of the animation remain similar to what we implemented for the glow effect. Make sure you put the particles cloud on top of ripple view.
ZStack {
  Capsule()
    .fill(.black)
    .keyframeAnimator( ... )

  KeyframeAnimator(
    initialValue: 0.0,
    trigger: glowAnimationID
  ) { value in
    ParticleCloud(
      center: dragLocation,
      progress: Float(value)
    )
    .clipShape(Capsule())
  } keyframes: { _ in
    if glowAnimationID != nil {
      MoveKeyframe(.zero)
      LinearKeyframe(
        1.0,
        duration: 0.4
      )
    } else {
      MoveKeyframe(1.0)
      LinearKeyframe(
        .zero,
        duration: 0.4
      )
    }
  }

  ...
}
Conclusion
It was certainly a loaded but fascinating journey. We explored various approaches to working with shaders and their application in creating interactive UI components, particularly using the compute pipeline as a simple way to implement a particle system.
Where to go from here? You could, for instance, optimize by moving particle rendering from the compute pipeline to the rendering pipeline, which could potentially boost performance. Or add even more details about each particle, including the shining border and geometry changes.
As promised, here’s a link to the gist with the source code of this animation. Also sharing useful materials for a deeper dive into working with shaders:
- Memory Layout in Swift
- Metal in SwiftUI: How to Write Shaders
- Developer Documentation: Compute Passes
- Developer Documentation: SwiftUI Gestures
- metalkit.org
- The Book of Shaders
- Inigo Quilez
If you are also interested in learning the basics of rendering pipeline, check out my other article where we create a performant dissolve effect in Metal.
See you in the next experiments 🙌